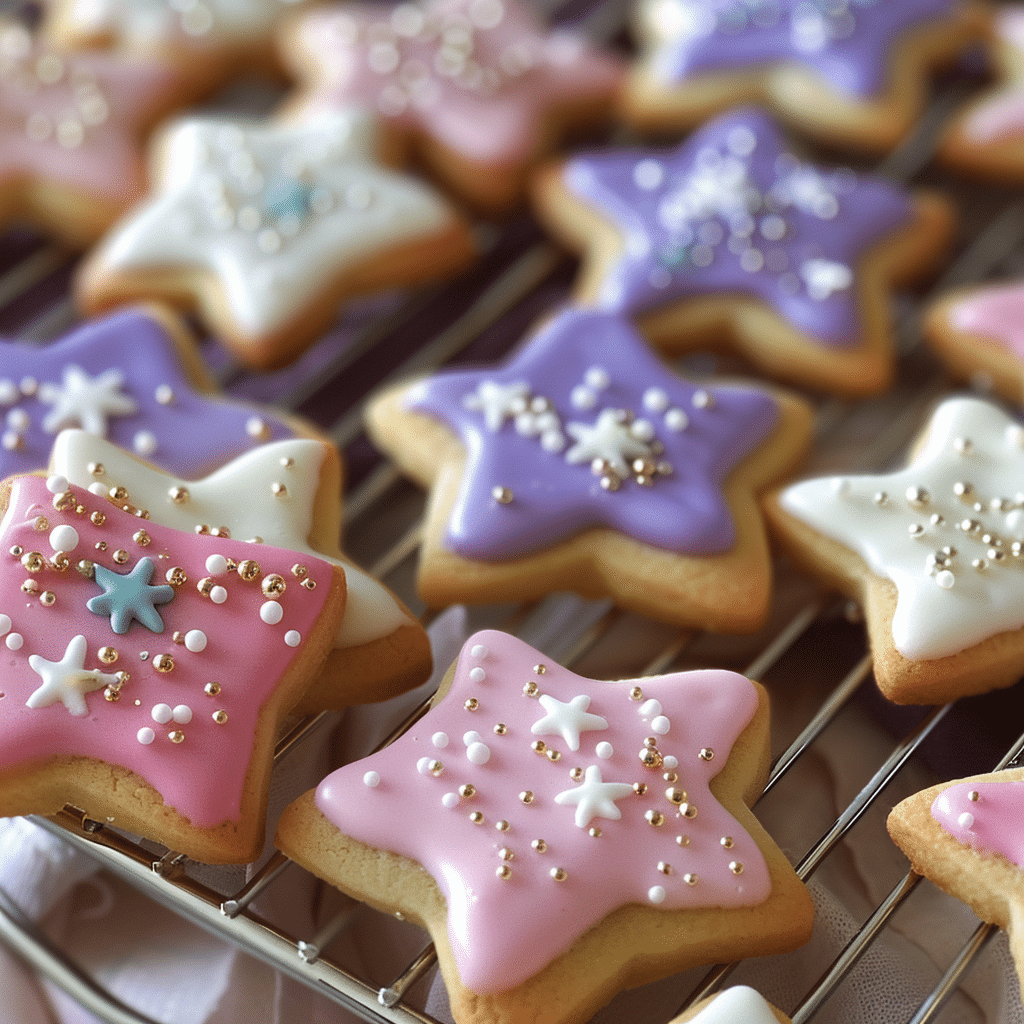
Glitter royal icing cookies are the ultimate way to turn a simple treat into something truly unforgettable. With crisp, buttery bases and a glossy royal icing finish, these cookies get their sparkle from a dusting of edible glitter that makes them perfect for celebrations—or just because. In this gluten-free version, you’ll find all the magic of classic decorated cookies without the wheat. From choosing the right glitter to mastering the icing flow, this guide walks you through each step. If you’ve ever wanted your cookies to shine as brightly as they taste, this is the recipe you’ve been waiting for.
Print
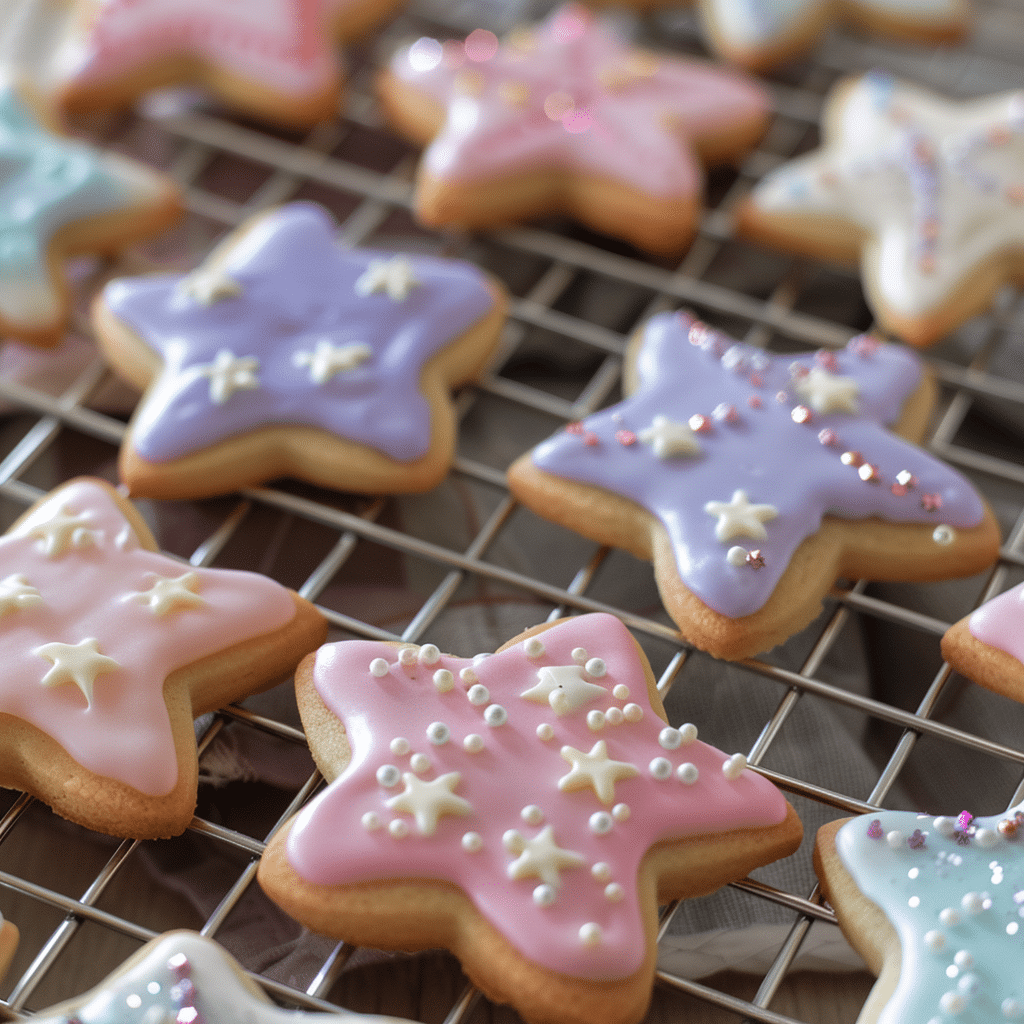
Glitter Royal Icing Cookies
- Total Time: 1 hour 45 minutes
- Yield: 24 cookies 1x
Description
Crisp, buttery, and gluten-free, these glitter royal icing cookies are perfect for any celebration. Topped with smooth royal icing and sparkly edible glitter, they’re fun to decorate and even more fun to eat.
Ingredients
2½ cups gluten-free all-purpose flour (with xanthan gum if not included)
½ tsp baking powder
¼ tsp salt
¾ cup unsalted butter, softened
¾ cup granulated sugar
1 large egg
1½ tsp vanilla extract
½ tsp almond extract (optional)
4 cups powdered sugar, sifted
3 tbsp meringue powder
6–8 tbsp warm water
Gel food coloring
Edible glitter (FDA-approved)
Clean food-safe brushes
Piping bags and round icing tips (size 2 or 3)
Instructions
1. In a bowl, whisk gluten-free flour, baking powder, and salt.
2. Cream butter and sugar until fluffy. Beat in egg and extracts until smooth.
3. Add dry ingredients and mix until a soft dough forms. Chill for 1 hour.
4. Roll dough to ¼-inch thick. Cut shapes and place on a baking sheet.
5. Bake at 350°F for 9–11 minutes. Let cool completely on a wire rack.
6. Beat powdered sugar, meringue powder, and water until stiff peaks form.
7. Adjust icing consistency; color and transfer to piping bags.
8. Outline and flood cookies. Dry 4–6 hours before decorating.
9. Apply edible glitter by brushing onto dry icing or pressing into wet icing.
10. Let decorated cookies dry at least 12 hours before storing or gifting.
Notes
Store cookies in an airtight container at room temperature for up to 7 days.
Avoid refrigeration to prevent icing from softening or colors from bleeding.
Individually wrap cookies or layer in tins with parchment for gifting.
- Prep Time: 25 minutes
- Cook Time: 10 minutes
- Category: Cookies
- Method: Baking
- Cuisine: American
Nutrition
- Serving Size: 1 cookie
- Calories: 130
- Sugar: 12g
- Sodium: 45mg
- Fat: 5g
- Saturated Fat: 3g
- Unsaturated Fat: 2g
- Trans Fat: 0g
- Carbohydrates: 20g
- Fiber: 0g
- Protein: 1g
- Cholesterol: 20mg
Keywords: glitter royal icing cookies, gluten-free cookies, sparkle sugar cookies
The Story Behind Glitter Royal Icing Cookies
Table of Contents
A Memory Glazed in Glitter
The first time I ever saw glitter royal icing cookies, I must’ve been seven, eyes wide, watching my grandmother sprinkle what looked like edible fairy dust over freshly iced stars. She didn’t call it “royal icing” back then—just “the shiny stuff that dries hard”—but to me, it was pure magic. I stood on tiptoe at the kitchen counter, hands sticky from sugar, completely enchanted. That was the beginning of my love for beautiful, edible sparkle.
Now, decades later, in my cozy North Carolina kitchen where the oven warms more than just dough, I’m revisiting those sweet memories with a modern twist: a gluten-free version that Delivers all the sparkle without a single concern. These glitter royal icing cookies bring together my passion for classic baking and a love for adding a little visual joy to every bite. and they’re just as satisfying as our gluten-free carrot cake cupcakes, another family favorite I love sharing year-round.
Why Glitter Royal Icing Cookies Belong at Every Celebration
Let’s be honest—cookies are already a crowd favorite, but add royal icing and a dusting of edible glitter, and suddenly they’re the center of attention. The beauty of glitter royal icing cookies is how versatile they are: shape them into snowflakes for the holidays, hearts for Valentine’s, or crowns for a birthday party. They instantly elevate any occasion.
Royal icing sets up smooth and firm, making it the perfect canvas for intricate designs or bold, simple statements. And the glitter? That’s just the fun part—pure edible sparkle that catches the light and makes people say, “Wait, you made these?” Best of all, with gluten-free ingredients, they’re accessible to just about everyone.
You’ll also find that once you get the hang of the icing process, you can make these cookies your own.
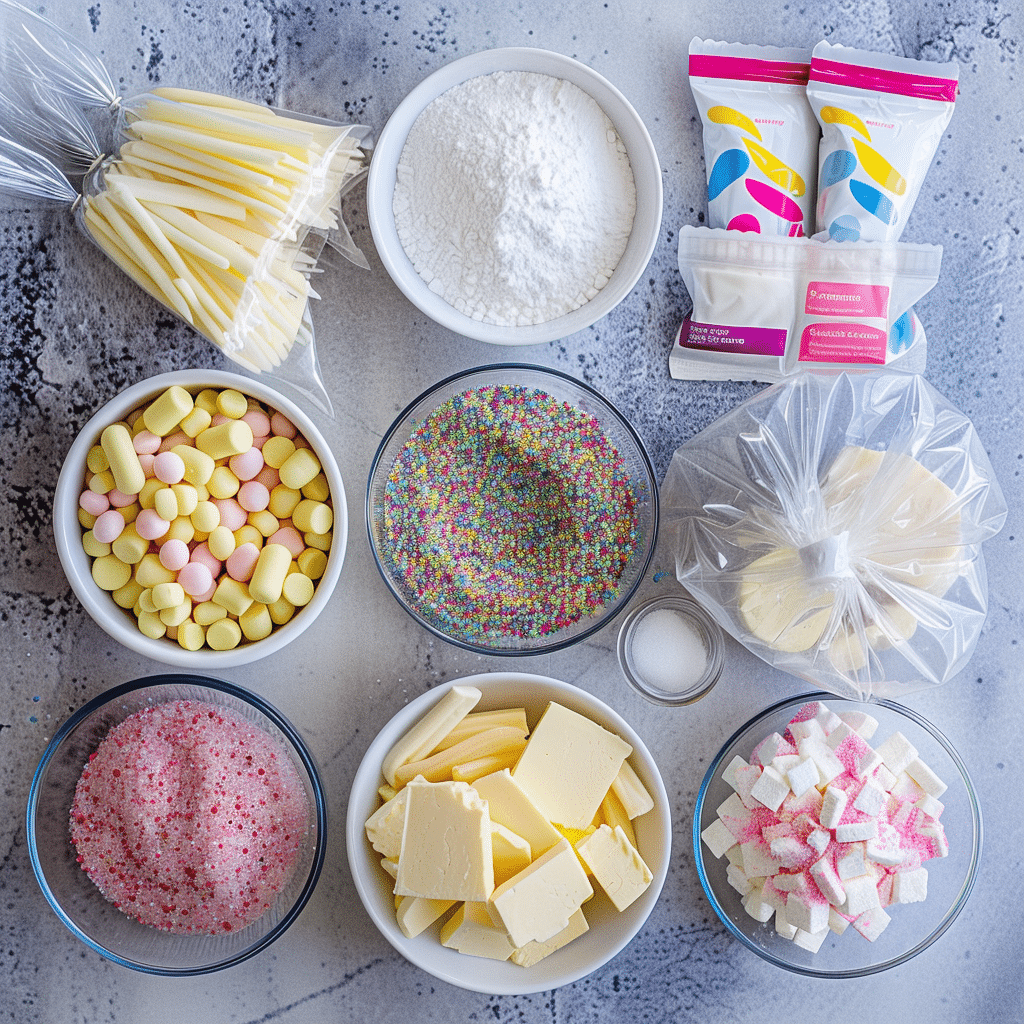
Ingredients & Tools for Glitter Royal Icing Cookies
Gluten-Free Glitter Cookie Ingredients You Can Trust
When making glitter royal icing cookies, especially gluten-free ones, ingredient quality is everything. These cookies need to hold their shape, taste amazing, and offer that perfect crisp bite underneath all that sparkle. Here’s what you’ll need:
For the Cookies:
- 2½ cups gluten-free all-purpose flour (with xanthan gum if your blend doesn’t include it)
- ½ tsp baking powder
- ¼ tsp salt
- ¾ cup unsalted butter, softened
- ¾ cup granulated sugar
- 1 large egg
- 1½ tsp vanilla extract
- Optional: ½ tsp almond extract (for a bakery-style flavor)
For the Royal Icing:
- 4 cups powdered sugar, sifted
- 3 tbsp meringue powder (ensure it’s gluten-free)
- 6–8 tbsp warm water (adjust as needed)
- ½ tsp vanilla or almond extract (optional for flavor)
- A few drops of gel food coloring (water-based colors can affect consistency)
To Decorate:
- Edible glitter (FDA-approved only—avoid craft glitters)
- Luster dust or shimmer powder (optional)
- Clean paintbrushes or dry stenciling brushes
- Piping bags and small round icing tips (like #2 or #3)
Must-Have Tools to Make Your Cookies Shine
Having the right tools makes decorating glitter royal icing cookies smoother—and way more fun. Here’s what you’ll want on hand:
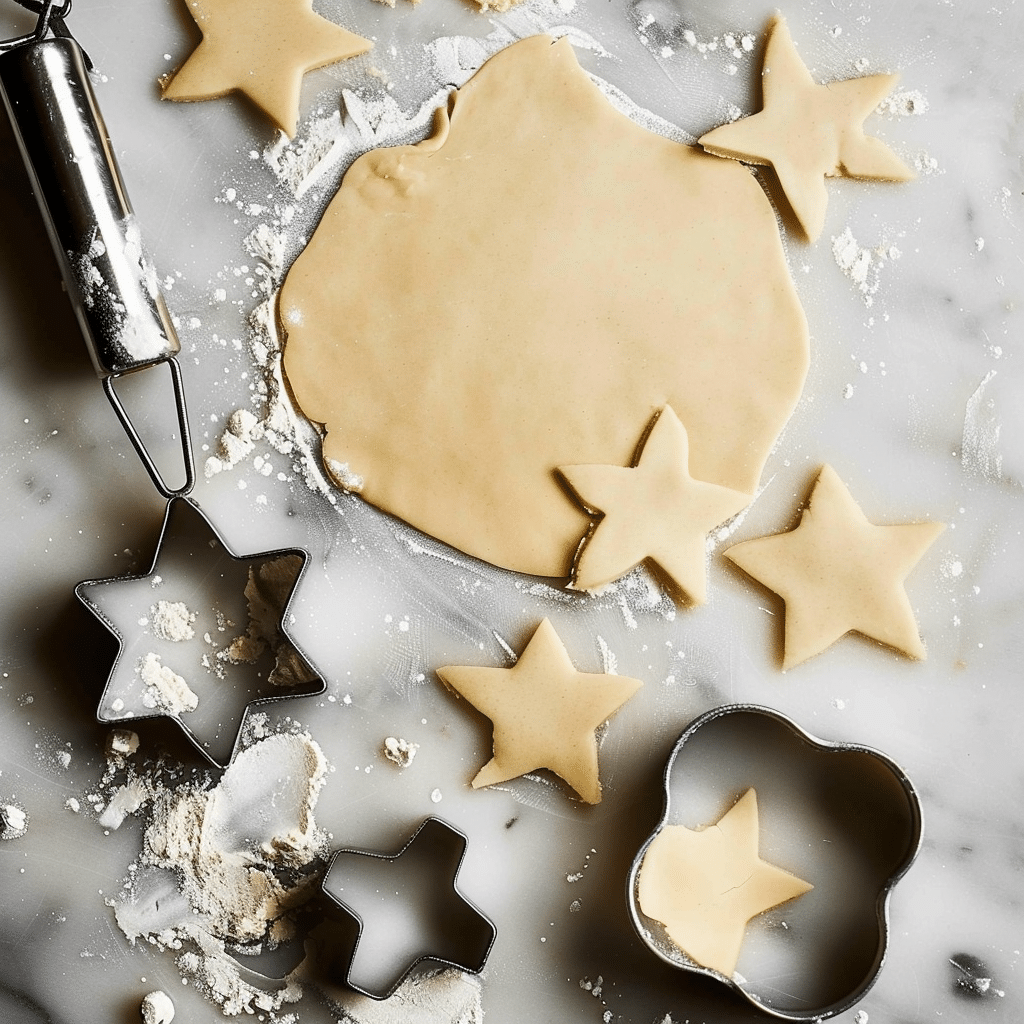
- Rolling pin with guides for even dough thickness (¼ inch is ideal)
- Cookie cutters in fun shapes for your theme
- Scribe tool or toothpick for popping bubbles and shaping icing
- Drying rack and parchment paper for proper icing set-up
- Food-safe glitter brush or small strainer for applying shimmer evenly
Whether you’re using a piping bag or a squeeze bottle, precision counts. And don’t forget a clean, dry surface—royal icing doesn’t play well with moisture.
How to Make Glitter Royal Icing Cookies Like a Pro
Mix, Chill, and Bake Your Cookie Base
Before you can decorate, you need a cookie that holds its shape and tastes just as delightful as it looks. Here’s how to make glitter royal icing cookies from the base up—gluten-free, of course.
- Whisk your dry ingredients
In a medium bowl, combine 2½ cups gluten-free flour, ½ tsp baking powder, and ¼ tsp salt. Set aside. - Cream the butter and sugar
In a large mixing bowl, cream together ¾ cup of softened butter and ¾ cup of sugar for around 2 minutes, until the mixture becomes pale and airy. Add 1 egg and 1½ tsp vanilla extract (plus almond, if using). Mix until smooth. - Combine and chill
Slowly add dry ingredients to wet, mixing until a soft dough forms. Divide in half, flatten into discs, wrap in plastic, and chill for at least 1 hour. - Roll and cut
Flatten the chilled dough to about ¼ inch thick using a lightly floured surface. Cut into your favorite shapes using cookie cutters.
- Bake and cool
Carefully arrange the cookies on a parchment-lined tray and pop them in a 350°F (175°C) oven for 9 to 11 minutes, or until the edges start to turn a light golden color. Cool completely on a wire rack before decorating.
Icing, Glittering, and Bringing the Sparkle
Now the real fun begins: icing and decorating. This is where your glitter royal icing cookies go from ordinary to magical.
- Mix the royal icing
In a large bowl, combine 4 cups sifted powdered sugar and 3 tbsp meringue powder. Add 6 tbsp warm water to start, beating on low speed for 7–10 minutes until stiff peaks form. Add water, a teaspoon at a time, to thin for flooding consistency. - Color and bag
Separate the icing into different bowls and add gel food coloring to each one. Use thicker icing for outlines and thinner for flooding. Transfer to piping bags fitted with small round tips. - Outline, flood, and dry
Outline the edges of each cookie with icing to create a border, then fill in the center. Use a toothpick or scribe tool to gently spread the icing and eliminate any air bubbles. Let cookies dry for 4–6 hours before adding glitter. - Apply glitter
For dry glitter: Use a clean, dry brush to dust edible glitter over the fully dried icing. For a painted shimmer: mix luster dust with a few drops of clear alcohol (like vodka) and paint onto the surface. For sparkle highlights, gently press glitter into the wet icing immediately after flooding.
The process is easy once you’ve piped and dried the base layer—think of it like styling white chocolate pretzels with sprinkles and shine, but more refined.
Decorating Glitter Cookies with Royal Icing
Decorating Techniques That Make Cookies Shine
Once your cookies are iced and ready, it’s time to make them sparkle. Decorating glitter royal icing cookies is where creativity takes the spotlight.
Dry brushing technique: Once the icing is fully dry, dip a clean brush into edible glitter or luster dust and lightly sweep it over the surface. This gives a subtle, elegant shimmer.
Stenciling: Lay a cookie stencil over the dry icing, gently dab on glitter with a sponge or brush, then lift carefully to reveal crisp designs. It’s perfect for snowflakes or monograms.
Painting with shimmer: Mix luster dust with a small drop of vodka or lemon extract to make edible paint. Delicately apply details using a fine-tipped brush to create outlines, twinkling stars, or bold accents.
Layered sparkle: Try adding glitter to piped accents like dots, lines, or rosettes while the icing is still wet for a more dimensional design.
These cookies aren’t just eye-catching—they’re incredibly giftable. If you enjoy elegant, shareable treats like my chocolate pistachio cheesecake bars, you’ll love boxing up these glittery cookies with a bow and a note.
Storing and Gifting Glitter Royal Icing Cookies
Decorated cookies deserve to be enjoyed slowly—and stored properly. Here’s how to protect your beautiful work:
- Let them dry completely: Royal icing must dry for at least 12–24 hours before stacking or packaging. Test by gently pressing with a fingertip—if it dents, it’s not ready.
- Store in layers: Use parchment between cookies and place in an airtight container at room temperature. They’ll stay fresh for up to 7 days.
- Freeze with care: Unfrosted cookies stay fresh in the freezer for up to 90 days. For decorated ones, freeze flat with layers of wax paper between, and bring to room temp in their container to avoid condensation.
- Gift like a pro: Wrap cookies individually in clear cellophane bags tied with ribbon, or nestle in cookie tins with festive tissue paper. Add a tag for a charming, handmade touch.
FAQs About Glitter Royal Icing Cookies
How to add glitter to royal icing?
You can add glitter while the icing is still wet for it to stick naturally, or brush edible glitter onto fully dried icing for a more even finish. For extra shine, paint on glitter using a mixture of luster dust and alcohol.
What is the difference between cookie icing and royal icing?
Royal icing dries hard, making it perfect for detailed decorating and stacking. Cookie icing (or glaze icing) stays softer and has a shinier, less firm finish. Royal icing holds shapes better and works best with edible glitter.
Do cookies frosted with royal icing need to be refrigerated?
Royal icing prepared with meringue powder doesn’t require refrigeration, as it is shelf-stable. Keep the cookies fresh by storing them in a sealed container at room temperature. Avoid the fridge—it can cause the icing to soften or colors to bleed.
What does adding corn syrup to royal icing do?
Adding a small amount of corn syrup makes the icing slightly shinier and less brittle, giving it a smoother, more flexible finish—especially helpful when working with glitter or luster dust.
Conclusion:
There’s something undeniably joyful about making glitter royal icing cookies—it’s where baking meets art, and where tradition gets a sparkly twist. For me, these cookies are more than just sweet treats. They’re a tribute to childhood memories, family traditions, and the simple happiness that comes from creating something beautiful by hand.
Whether you’re baking for a holiday, a birthday, or just a rainy afternoon, these glitter royal icing cookies let you share a little magic with the people you love. So preheat the oven, grab your glitter, and don’t be afraid to get creative. After all, baking is better when it sparkles. Discover delightful dessert inspiration every day on HomemadeCake’s Pinterest, and stay updated with our latest creations by following us on Medium.